Wednesday, October 28, 2020

Student Email Skill: How and When to Use CC and BCC

As students become more adept at using email to communicate with teachers, learning to use the Carbon Copy and Blind Carbon Copy functions of an email platform is valuable. These two, simple functions can help students be more efficient, same time, provide privacy and demonstrate some digital citizenship. The screenshots below are designed to show students where to access these functions and how they work. Feel free to share these examples with your students.

Where to access the Carbon Copy and Blind Carbon Copy functions

In Gmail, at the right side of the first row/line of an email message, you will see the symbols for both. Cc stands for Carbon Copy and Bcc stands for Blind Carbon Copy. Clicking on either one will add a row/line below the first row/line. 


The names or email addresses you put in the Cc line will receive a Carbon Copy of your message. This is used when you want other people to be aware of the message you are sending to an individual or group. The people you Cc are those you do not expect to reply to the message. 

Bcc is a tool for protecting the privacy of people's email addresses when part of email groups and mailing lists. Names in the Bcc line will not be visible to each other. If you put multiple names in the Bcc line, they will not know the message is being sent to other people. They will receive the message and not know who else can see the message. 


When might students use these functions?

Students could use Carbon Copy when sending a general inquiry message to all of their teachers. For example, if communicating about an upcoming absence, they could Cc all of their teachers and counselors. 

Students might use Blind Carbon Copy when sending a message to multiple classmates. Leadership students who are tasked with messaging large amounts of classmates for school events would use this to ensure they don't get a flood of Reply All messages. Another example for use of Bcc is in a community service project when students are sending messages to community organizations and members.

If you have any questions and would like a follow up, contact me via Gmail or Hangouts at ajuarez@cojusd.org. 

My book, The Complete EdTech Coach: An Organic Approach to Digital Learning, co-authored with my wife Katherine Goyette is now available on Amazon. Click here to purchase. It is published by Dave Burgess Publishing. Be sure to follow the hashtag #OrganicEdTech and #CVTechTalk for updates.

Tuesday, October 27, 2020

Dear Students, It's Very Important Your Learn to Properly Compose An Email


Composing an email is more important than ever. For today's generation, this is the equivalent skill of my generation learned when we were taught to compose handwritten letters. If you are reading this blog post, I am willing to bet good money that you have at least one story of receiving an email from a student where the entire email message was written in the subject line or the message was written in all caps or composed like a text message. 

When I work with students, I try to educate them on how email is a more formal way of communicating. It's used for communication with employers, teachers, etc. Students are already very adept at writing a text messages, but email is different. Text messages are informal communication for less formal things. 

Upping students' email skills is crucial in distance learning. These skills can improve the communication between teacher and student. It can positively affect their ability to learn and achieve now and in the future. A poorly composed email could be the difference in passing and failing a class. Below is a series of screenshots that you can share with students to show them the basics of composing a proper email. 

Step 1: Go to Gmail and click the Compose button in the top left corner. Other email apps and platforms follow a similar format.


Step 2: In the pop up that appears, this is where you will compose your email. In the first row, type out your teacher's name or email address. In the second row, type your Subject. This is only a short preview of your message. 

In the example below, the subject says "Questions about my grade". The subject should be a short sentence at most. In the third row (larger space), compose your message. Do your best to use proper grammar and spelling. Start with a greeting like "Hello" or "Good afternoon". End your message with a "Thank You" and add your name at the end. 


Below is a series of screenshots of how NOT to compose an email. 

Your message should NOT be composed in the Subject line. 


Compose your message here, but do NOT type it the way you would type a text message. Do your best to use proper grammar and spelling. This is important to remember when you are communicating with teachers, professors and employers.


Three Options for Digital Timers for Zoom/Google Meet Lessons


Helping students manage time and stay on task during synchronous lessons is very important. One way to do that is the use of a digital timer. Many educators out there have made great use out of various timer programs such as the Kagan timer app among others. If you don't want to download another app, I have three options, all web based. 

The first digital timer option involves YouTube. This option works when you have a second monitor attached to your computer. In a nutshell, you will be dragging a "smaller" window, with a YouTube countdown timer video, into a larger window. The larger window is the window you are presenting synchronously to students. If you have students working independently, drag the smaller window into the larger window. In the larger window, you can display instructions and other info for the independent work while the smaller window counts down the time. Take a look at the screenshots below to learn how.


Step 1: On your other screen, open YouTube. Search for a countdown timer for the amount of time you want to give students. Once you've found the video, make the window smaller (as seen below).


Step 2: Drag the smaller window over to the window you are sharing on your Zoom/Google Meet call. The example below is from a class a recently taught where I gave students 10 minutes to build vocabulary with Quizlet. I shared the screen with Quizlet and dragged the "timer" window over. When finished, you can close the smaller window or drag it back.


Another option is to add Eggtimer as a search engine into Google Chrome. This is a trick I learned years ago at a demo slam conducted by my good friend Joe Marquez. What you see below is the finished product. Essentially, what you do is "train" Chrome how to start a timer right from the address bar aka Omnibox (Yes, that's what Google calls it). Once "trained", simply type "eg" in the address bar, click the spacebar, then type the time you want for a countdown.


Here is what it looks like when I set it to countdown for 10 minutes. This is something I use almost daily during synchronous lessons on Zoom/Google Meet. I use this option when I want the timer to be full screen and don't want to share anything content related on my screen during independent work.


Step 1: In the top right corner of Chrome, click the three dots. In the dropdown menu, click Settings.


Step 2: Scroll down and click Manage search engines.


Step 3: Where it says Other search engines, click Add.


Step 4: In the Search engine line type Eggtimer. In the keyword line, type "eg" (Make it lowercase because it's easier to remember). In the URL line, type this exactly e.ggtimer.com/%s then click Add


After Step 4, exit the Settings. Open a tab in Chrome. In the address bar aka Omnibox, type "eg" (lowercase) and push the spacebar. When you do, it will say Search Eggtimer. In the address bar, type the time you want for the countdown and hit enter. 


The screen will turn white with the countdown in big black numerals in the middle of the screen.


A third option is to insert a YouTube countdown timer video onto a slide in a Google Slides presentation. This is a very common and popular option. If this is new to you, check out the screenshots below to learn how. This is very useful when teaching on Zoom or Google Meet with a slides presentation and you want to give students some think time. This option allows you to not have to exit your presentation to access the timer. 

Step 1: On the slide(s) of your choice, click the Insert button and select Video.


Step 2: Click Search and use the search bar to find a countdown timer video for the time you want. For example, type "2 minute countdown timer".


Step 3: From the search results, click on the video you want and then click Select.


Below is what it looks like on your slide when in Edit mode. 


When in presentation mode, click the play button on the video to start your countdown timer.

Thursday, October 22, 2020

Use Unscreen to Add Transparent GIFs to Jazz Up Lessons


Animated GIFs are great, fun way to engage students with content and get them thinking creatively. GIFs are a huge part of popular culture and students love using them in their personal lives. When adding GIFs to our presentations, slides and lessons, there are occasions where the backgrounds of GIFs don't quite fit well. Aesthetically, it would look better if the object moving within the GIF didn't have a background. 

Unscreen allows you to take GIFs and remove the background creating a transparent GIF. For example, if I taught an ELA lesson on examples of rage in literature, I could use Unscreen to create a transparent GIF of "Angry Tom" to really drive home my point in the lesson. Below see the difference between using a normal GIF and transparent Gif.


The GIF on the left has a background. That may not necessarily fit within the scheme or colors of your slides/lesson/presentation. The transparent GIF on the right will fit in your slide/lesson/presentation like a sticker. It will have a more natural feel. It gives you more creative flexibility. Using transparent GIFs can be a great way to power up your Bitmoji Classroom as well. Below is a series of screenshots that shows you how to get started using Unscreen.

Step 1: Go to Unscreen.com. If you have a GIF or MP4 file saved on your computer, click Upload Clip to import. If you want to search already made GIFs from the Giphy.com site, click Search GIF. Search GIF is probably the easiest way to get started as a first timer.


Step 2: If you chose the Search GIF option, in the window that appears, you can type your search query in the search bar. Click on the GIF of your choice. 


Step 3: Once you choose your GIF, it will process in seconds and you'll see the background removed from the image. This is evident as you will see a gray and white checker pattern behind the animated GIF. 


Step 4: Click the arrow next to download and select GIF. This will download the transparent GIF to your computer and it can be imported to any lesson, slide or presentation.


Below is the transparent GIF I downloaded from the screenshots above. 

Tools like Unscreen, Remove.bg and the GIFit! Chrome extension are great for upping the aesthetics of your lessons, slides and presentations with GIFs and transparent images. Removing the backgrounds from images and GIFs can add a whole new dimension. Click here to read a blog post I wrote recently on getting started with Remove.bg. Click here to read a blog post I wrote recently on getting started with the GIFit! Chrome extension. How will you use GIFs and transparent images to jazz up your teaching?

Wednesday, October 21, 2020

Encourage Students to Act on Teacher Feedback with Google Classroom


Feedback is such an important part of the learning process. The key word in that statement is "process". Authentic learning that sticks comes from mistakes made and adjustments done based on teacher/mentor feedback. Whether you are in distance learning, hybrid or face to face, speed of teacher feedback and student reaction to it is key.

In distance learning, it's easy for teachers to leave quick feedback on student work through platforms like Google Classroom. A big issue, though, is how students ignore feedback or not used to replying or acting upon it. Getting students to see the feedback and use it to iterate and improve work is a challenge. Oftentimes, students aren't aware of the tools available to them for receiving feedback, acting on it and submitting work. Below is a series of screenshots that shows teachers how to quickly leave feedback on Google Classroom assignments and how students can view teacher feedback, act on it and resubmit.

The Teachers

In Google Classroom, open an assignment to view student work. On a Google Doc, Google Slides Presentation, Google Drawing or PDF, you can leave a comment. This can be done by right clicking on a portion of the document and selecting Comment. On PDFs and images, there is a Comment button on the top right of the grading window. Leaving comments this way puts the comment directly on the document rather than just a Private Comment on Google Classroom.


Below is an example of what a comment box will look like on Google Slides.


The Student

Below is an example of an email a student will receive when a comment is left. The student will see the feedback left and a link that takes them back to the document.


After acting on the feedback, in Google Classroom, students can click the Resubmit button to turn in the newest iteration of their work. If a Resubmit button is greyed out, it means the teacher hasn't returned the assignment to the student. Be sure to leave comments and return work to students promptly so they can iterate and resubmit.

If you have any questions and would like a follow up, contact me via Gmail or Hangouts at ajuarez@cojusd.org. 

My book, The Complete EdTech Coach: An Organic Approach to Supporting Digital Learning, co-authored with my wife Katherine Goyette is now available on Amazon. Click here to purchase. It is published by Dave Burgess Publishing. Be sure to follow the hashtag #OrganicEdTech and #CVTechTalk for updates.

Thursday, October 15, 2020

You're Not Going To Want To Miss Fall CUE 2020

 The organization of CUE, Computer Using Educators, has been one of the greatest forces in my development as an educator. In addition to getting involved in "EDU Twitter", joining CUE was a watershed moment in my career. CUE has connected me with countless educators who continually fill my teacher soul with ideas and strategies. This network not only refreshes me professionally, but personally as well. I consider many of them dear friends. Now I am not suggesting you replace your old friends with educator friends, but CUE will really help you connect with like-minded people. I am an extreme example, as not only did I meet my wife via CUE, we actually got married at Fall CUE 2018. The ceremony was a session attendees could attend. 

When you attend CUE, that strategy you've been looking for to reach the "one student" can be found. The idea you've been pining for to spice up your lessons is waiting for you. If you feel you need to save time and improve efficiency, there will be plenty of sessions to help with workflow. If you're looking for strategies to improve coaching or how an admin can best leverage coaches or improve efficiency or how to reimagine images, CUE has you covered (hint: my sessions).

This year, Fall CUE will be virtual. The beauty of virtual Fall CUE is that it only costs $79. Even better, the district will cover that cost for you. That is a bargain for high quality PD. No matter your grade level, subject, position or experience level, there is something for everyone at Fall CUE. If you are looking to learn more about Google, Microsoft, Apple, Tech Coaching, SEL, K-2 students, ELL's, etc, Fall CUE has you covered.

Reply to this email and your name will be sent to the district office to register. Attendees will not be compensated for time. Only registration for the conference is covered by the district. If you attend, please save your notes and other resources as evidence of attendance.

Thursday, October 8, 2020

Organize Distance Learning and Teaching with Bookmarks Bar Folders


When I was growing up, my mom was staff developer for a program called True Colors. In a nutshell, True Colors explains 4 parts of our personality. Each part is assigned a color: Gold, Blue, Green and Orange. We all have each color, but some are more dominant than others. The key is to know when to draw on each color when the situation calls for it. To learn more about True Colors, click here.

In education, teachers and students, distance learning or in-person, the "Gold" part of your personality is essential. Gold is the part of your personality that is organized and punctual. It's the part of your personality that "gets things done". 

One way you can draw upon your Gold, in distance learning, whether as a teacher or student, is to make use of the Google Chrome Bookmarks Bar and Bookmark Manager. In my experience, teachers are somewhat familiar with bookmarking websites, but I have seen too many bookmark bars in Chrome that are completely disorganized and chaotic. These bookmark bars definitely could use a little bit more Gold. If you teach multiple subjects or classes, you could create a Bookmark Bar folder for each subject or class with Zoom links and instructional sites you use for each.

For students, organizing the links/bookmarks they use in each class in Bookmarks Bar folders is a "golden" organizational tool. They can create a Bookmark Bar folder for each class period to set up easy access to class Zoom/Meet links and other instructional sites used in the respective classes. In my experience, students rarely make use of their Bookmarks Bar. 

Below is a series of screenshots that will help you get started using the Bookmarks Bar and Manager as well as setting up Bookmark Bar folders. 

At the far right of your Address Bar (Omnibox), you will see a "star" button. This button allows you to bookmark websites. You can customize the name of each site you bookmark. Each bookmark will appear on your Bookmarks Bar.


By default, the Bookmarks Bar is hidden. You will need to go to Google Chrome settings to make it visible. Click the three dots in the top right corner. Hover your cursor over Bookmarks (no need to click).


When you hover your cursor over Bookmarks, a menu will appear. Click Show Bookmarks Bar to make your Bookmarks Bar appear on your Chrome browser.


Websites and addresses you've bookmarked will appear from left to right across the Bookmarks Bar. There is a limited amount of space on the Bar. One way to manage that space is to put bookmarks in folders. Begin the process of organizing with folders by right clicking on the Bar or on any bookmark. You will see a menu that gives you many options. One option is to Edit. This lets you rename the bookmark and move into folders. If you click Add Folder, you can create folders for your bookmarks. If you are a student or teacher with multiple classes, you can create a folder for each class containing Zoom or Meet links as well as other links used frequently for the respective classes.


When you click New Folder, what you see below will appear allowing you to name it. As you have more folders added, those folders will appear in the list and if you click on one of them, your new folder will become a subfolder.


When you right click on a bookmark or folder, you also get the option of going to the Chrome Bookmark Manager. This gives you more options for organization of bookmarks and folders.


The Bookmark Manager shows the hierarchy folders on the left side. When you click on a folder, you are able to see what bookmarks and subfolders are in the folder. Bookmarks and subfolders can be dragged, dropped and rearranged. You can drag them to the left to organize them into other folders as well.


When you are back to your browser and click on a folder in the Bookmarks Bar, a dropdown menu will open showing the bookmarks. Click it again to close it. Students and teachers could set this up to have a folder for each class period with relevant links. This can save time and effort from having to fish through emails and Google Classroom for the same links.


The animated GIF below shows how you can drag bookmarks into folders right from the Bookmark Bar.


New Quizizz Lesson Feature


Anyone who knows me knows how much I love Quizizz. It's my favorite way to do informal formative assessment. I love using it as part of the Fast and Curious EduProtocol. I use it weekly to build vocabulary. Not too long ago, Quizizz unveiled a new, beta feature that allows you to teach an interactive lesson. The lesson feature is similar to what you can do with Pear Deck. 

You may be thinking, why not just use Pear Deck? I could use Pear Deck, but as a frequent user of Quizizz, my students are comfortable with Quizizz and running interactive lessons through Quizizz allows me to facilitate on a format in which students are familiar. In a distance learning environment, it's a good idea to not overwhelm students with too many platforms and apps. Quizizz can help with that by being a platform for CFU, formative assessment, vocab practice and lesson delivery. 

Below is a series of screenshots that shows you how to get started using the Quizizz lesson feature.

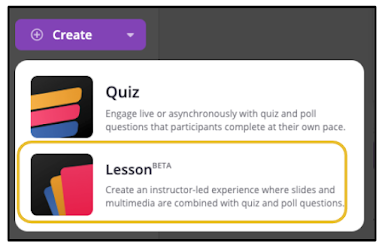
Step 1: Login to your Quizizz account and click Create


Step 2: In the dropdown menu, choose Lesson. (It's currently in Beta so it will be getting new, improved features as time goes on.)


Step 3: Similar to creating a Quiz on Quizizz, enter the Lesson Title, choose your subject and click Next.


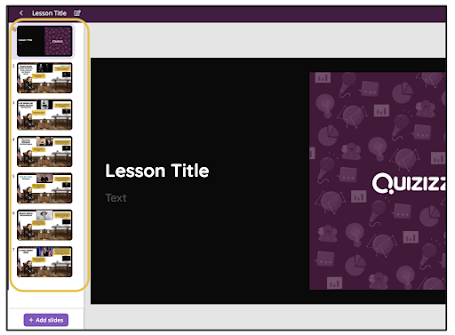
Step 4: After clicking Next, you'll taken to the Quizizz slides builder. Click Add slides in the bottom left corner.


Step 5a: You can choose from a variety of templates and interactive question types.


Step 5b: If you want to create your slides in Google Slides or PowerPoint, you can import them. This is what I prefer to do. You will need to download your slides as a PDF in order to import into Quizizz. Below you see an example with Google Slides. PowerPoint has a similar option.


Step 6: When the PDF of your slides has been uploaded, you will be able to pick and choose which slides you want to use. Pick some or all.


Step 7: Your slides will appear in the Quizizz slides builder. The imported slides are static and cannot be edited as they are images of your pre-made slides from Google Slides or PowerPoint. You can add other slides using the Quizizz templates or inject CFU and reflection questions in between your slides.


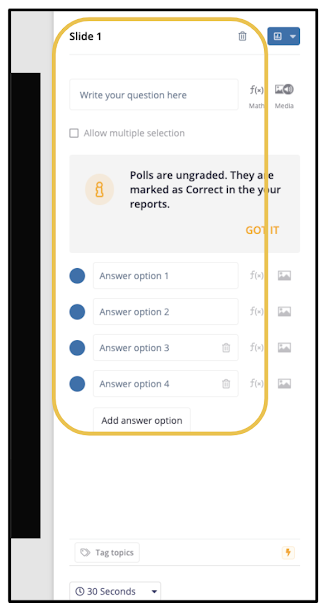
Step 8: If you add questions (My favorite part of using Quizizz lesson feature.), you can choose from Multiple Choice, Checkbox, Fill-in-the-blank, Poll or Open-Ended. Whichever type or types you choose to use throughout your lesson, you will get a report at the end with all student responses. 


Below are some screenshots of the different question types you can add in between your slides.

Multiple Choice


Fill-in-the-Blank

Poll


Open-Ended

The following screenshots show the basics of facilitating a lesson using the Quizizz lesson feature.

Step 1: After setting up your slides and questions, open the lesson from My library. Click Start a live lesson. For Asynchronous work, choose Assign homework.


Step 2: Choose your settings and click Present.


Step 3: After clicking Present, this screen below will appear and students will join with the code. Every time you use this lesson, there will be a different code. Remind students to use their real first and last names. The report of student responses at the end can be used for participation points, formative assessment and other grading purposes. Click Start when ready. If a student needs to join late, the code will be pinned at the top of the screen by default.


Step 4: When your first slide appears, you will see a control panel on the bottom left that allows you to navigate through the slides.


Step 5: When you come to a Question slide, there will be a three second countdown and students will be able to answer the question on their end. On your end, you will see student responses appear on the screen as they are submitted. These can be hidden.
 

Step 6: When you get to the end of your lesson, you will see a leaderboard just like when you do with a quiz in Quizizz. To see the results and student responses for each question, click the View reports button.


Step 7: The screenshot below is an example of what the report will look like. It can be downloaded as a spreadsheet for PLC and data analysis purposes by clicking the Download button on the right side. You can see the data by Participants' scores, Question by Question, Overview and Topics (if you added topics to your questions).