Thursday, February 25, 2021

Get Started Using Wakelet with Students


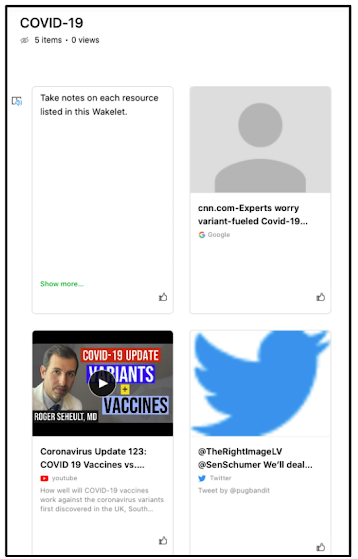
Curation of learning resources is a great way to differentiate and honor varied learning styles. Wakelet is a great tool for curation. It allows you to share one link to a variety of resources to files, web links, YouTube videos, PDF files, Google Drive files and more. Below is a sample of a Wakelet collection of various resources for a COVID-19 research activity.

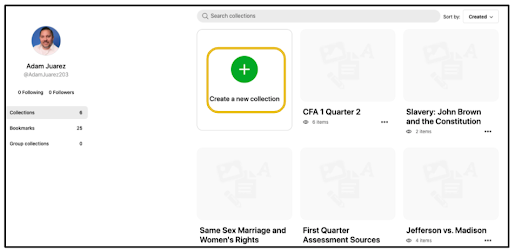
Get started by creating an account at wakelet.com. Once created, you'll be taken to your collections page. Click the plus button to Create a new collection.

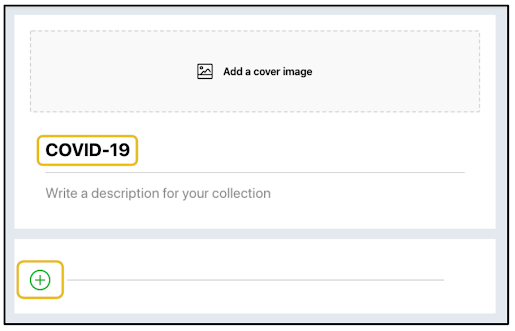
Give your new collection a title. You have the options to add a cover image and write a description of the collection. Click the plus button to begin adding resources.

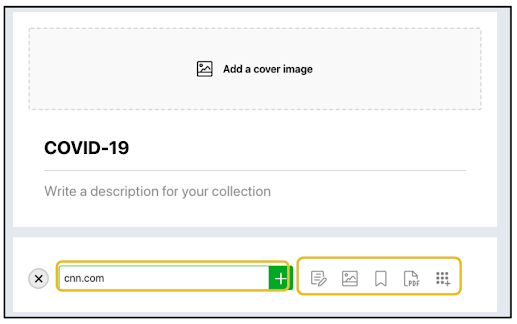
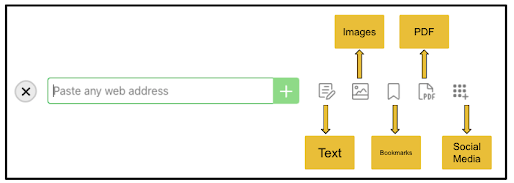
The first option is to add a web link or URL. The buttons to the right give you the options to add text, pictures, bookmarks, PDF files and social media posts.

The bookmarks option allows you to search for and add resources you've saved in Wakelet in other collections. The PDF option will open your computer's files and allow you to upload PDFs saved on your computer.

The text option allows you to simply type instructions or any message you'd like to share with students. This option gives you some basic style functions similar to those seen in Google Docs or Microsoft Word.


Clicking the social media option displays a drop down menu giving you the choice to add resources from Twitter, Flipgrid, YouTube, Google Drive and Microsoft OneDrive. For example, if doing a research activity on a subject like COVID-19, there are countless viewpoints and sources of information available on Twitter and YouTube. The Discovery tab in Flipgrid is another great resource for a myriad of topics.


When you click the image option, you can choose to upload an image from your computer or from your library. This library is a series of images curated by Unsplash. You can search this library for many topics. 


When adding to or editing a collection, you have the option to change viewing permissions. All Wakelet collections are Private by default. This means you are the only one who can view it. Unlisted, like with Google Drive, means only people you send the link to can view it. Public means anyone with a Wakelet account can search for and find it in Wakelet.


Another option you have when adding to or editing a collection is to change the collection's layout. My favorite is the Grid View.


Sharing your Wakelet collection is easily done. When you open a collection, you'll see a share button at the top, to the left of the edit button.


There are many ways for which to share a collection. You can share right to Google Classroom or Microsoft Teams in addition to social media, Remind or via QR code. You can also copy the link and paste it wherever you need.


This blog post is merely an introduction to Wakelet and is designed to get you started. There are many more features to this curation tool. I encourage you to get started and experiment with it. How will you use Wakelet to curate resources for students and colleagues?

Wednesday, February 24, 2021

New Lists in Google Tasks


On November 4, 2020, I wrote a blog post about how to utilize Google Tasks to schedule reminders for the tasks you do daily, weekly or monthly. If you're anything like me, this task list can get long. One way to organize your tasks and differentiate between tasks for lesson planning, grading, coaching and or other administrative things is to use the Create a new list function. 

The Create a new list function is a feature that is hiding in plain sight. I use it to categorize my tasks. I have a list for tech coaching, grading and lesson planning. Access this function by clicking on "Your Name's" list in Google Tasks on the right side panel within Gmail.


In the dropdown menu that appears, click Create new list.

 Give it a title and click Done.


Immediately, Google Tasks will switch over to the new list. Just like normal, click Add a task to start your new list.


Editing tasks and adding date/time is the same.


When editing a task, you can move a task from one list to another as needed.


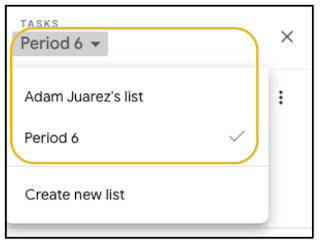
To toggle between lists, click the Name of the list at the top of Tasks. You will then see a list of all the lists you've created. A checkmark will be next to the list that is currently open.


When viewing your list of lists, hover over one and click/drag the dots to rearrange them.


Next to Add a task, click the three dots to access more options in Google Tasks. If you need to rename a list, you will find the option here.


Google Tasks has been a game changer for my workflow during the pandemic. Using the Create a new list function has taken it to a new level. What new lists will you create? 

Tuesday, February 23, 2021

Immersive Reader, PDFs, Google Drive, Kami and Translation of Text


On February 5th, I wrote a blog post about how to use Microsoft's Immersive Reader to translate text for English learners and how you can record the "read aloud" as a video for kids as a scaffold. If you are having students read text online via Google Chrome, this works great, but what if you have text saved as a PDF in your Google Drive? In that situation, you cannot select text on a PDF when viewing via Google Drive.

To use Immersive Reader to translate and read aloud PDF text in Google Drive, you will need to open the PDF first in Kami.


With your PDF file open, hover over the text to make the Open with button appear. Click it and select Annotate with Kami in the dropdown menu.


When the PDF processes and opens in Kami, you will have two options. If, on the top right, you see an option to Run OCR, click it. Running OCR will allow you to select text on the PDF like you do when reading text on a website or on Google Docs. 


If the Run OCR button didn't appear automatically when the PDF opens in Kami, click the "hamburger menu" (three stacked lines) in the top right corner. In the dropdown menu, select OCR For Scanned PDFs. 


When OCR is finished running, you will be able to use your cursor to select text. With the text selected, right click anywhere in the selected text. In the menu that appears, click Help me read this. This will open Immersive Reader.


As explained in my blogpost from February 5th, Immersive Reader will appear and there will be a Play button that will read the selected text aloud.


If you want a translated read aloud, click the "open book" button in the top right corner. In the menu that appears, select your desired language. Turn on the switch for Document.

PowerPoint Slides as Virtual Background in Zoom


Do not readjust the visual settings on your computer. I am writing about PowerPoint. If you are reading this, it may come as a surprise to see me write about a Microsoft product instead of Google. That being said, although I specialize in Google, I aim to be device/platform/app agnostic. I actually use Microsoft Office pretty regularly for certain tasks, but Google is still my go-to. 

Not too long ago, a colleague of mine was tinkering with Zoom settings and discovered a new beta feature that allows you to set PowerPoint (Apple Keynote too) slides as virtual backgrounds. Google Slides is not an option yet. What this does is put your slides as the background when you share the screen and your torso in front of them. This creates an effect like you're on stage and your slides on the screen behind you. You can move a little bit horizontally as well as point to parts of the slide. Your body gets cut off from the screen if you rise or point vertically more than roughly one third of the way up from the bottom of the screen.

This feature, still in beta, is available on PCs and Macs using the Zoom Desktop Client app. You must have PowerPoint installed on the device. You students will need to also have the Desktop Client app on their Chromebooks, PCs or Macs. If using their mobile device to join your Zoom, they will need to use the Zoom mobile app and their mobile device must be a relatively updated model. Click here for a more detailed look at specifications from the Zoom Help Center.

Get started by having your PowerPoint slides saved on your computer. If you are like me and have all your slides saved in Google Drive as Google Slides, open the presentation, click File, hover over Download and click Microsoft PowerPoint. Your slides will be in your device's download folder as a PowerPoint presentation.

When your Zoom call has been initiated, click Share Screen.


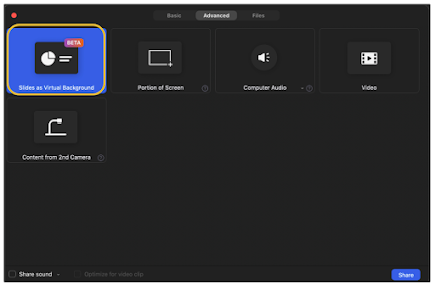
At the top of the Share Screen window, click Advanced. 


In the new menu that appears, click Slides as Virtual Background. Notice this is still in beta so there will be updates to this feature in the near future.


Your computer's files will pop up. The example below shows what it looks like on a Mac. A PC will look different, but it will function similarly enough. Select the PowerPoint presentation you want to use and click Open.


The first time you try this, you will be prompted to give Zoom access to control PowerPoint. Click OK. 


After loading, your Zoom screen will appear with the first slide of your PowerPoint Presentation and you'll see your torso at the bottom of the screen. At the bottom middle of the screen, you'll see a control button that will allow you to move ahead and backwards through the slides.


You are able to move horizontally across the bottom of the screen. Your ability to stand or point vertically ends at about one third of the way up from the bottom of the screen. Going past will see you cut off.


I think this is such a cool feature. It allows you to really personalize your presentation and better connect with students. Now they can see you while you teach. This seems like something very trivial, but it does make a difference for those looking to connect with you. There are some limitations now, but this is still in beta and will likely improve greatly over the coming months. You can bet I will be downloading many of my Google Slides presentations as PowerPoint. 

Friday, February 19, 2021

Google Workspace for Education Updates


In the last 48 hours, Google has announced some amazing new updates to Google Workspace for Education. After reading over their blog post and blog posts of fellow Googley edu-bloggers, here is a summary of some of the updates.

Google Classroom

Have you ever been typing instructions on a Google Classroom assignment and wished you could add bullets or bold/italicize/underline the text? If so, these features are coming very soon. 

This GIF comes from the Google Workspace for Education Blog

We have all probably struggled to see the content on an image of handwritten student work uploaded to Google Classroom. New upgrades to scanning of images will improve the quality of the submissions. Students will be able to use the Google classroom mobile app to scan multiple papers at once and submit as a PDF.

This GIF comes from the Google Workspace for Education Blog

In addition, Google Classroom will be getting tools to better track student engagement, offline support, improvements to grading on the mobile app and better integration with Google Meet, Student Information Systems and third party apps.

Google Meet

Most of the features we love about Zoom will now be available in Google Meet. Breakout Rooms will be scheduled beforehand easily via Google Calendar. You will be able to drag and drop attendees or choose them from a dropdown menu to arrange them into Breakout Rooms. 

This GIF comes from the Google Workspace for Education Blog


You will also be able to mute all students at the click of a button. 

This GIF comes from the Google Workspace for Education Blog


Students will not be allowed to stick around in the main room or breakout rooms when the teacher ends the meeting.

This GIF comes from the Google Workspace for Education Blog

If using Meet via Google Classroom, co-teachers will automatically be co-moderators with all the host controls the teacher has. During Meet video call, host controls will now include abilities to mute all participants at once, lock attendees microphones and remove all attendees. New options for attendees' reactions (raising hand is only option now in free version) have also been added. 


Google Drive

If you have students do a quiz on Google Forms, their progress will be saved automatically. This means they won't lose their progress if they lose connection or need to go to the restroom. They can reopen and continue where they left off. 

One of the coolest parts of Docs, Slides, Sheets, etc. is the ability to view Version History. Soon, this feature will become part of Jamboard. 

Chromebooks

There are some exciting new features for Chromebooks. One of my favorites is the built in screen capture function. In addition to improvements in the ability to take screenshots, you can now record your screen natively. In the past, you needed a screencasting extension to do this. 

This GIF comes from the Google Workspace for Education Blog


Recently, Google Meet added live translated subtitles. This function will now be added to accessibility features for the Chromebook. In addition, a telestrator function will be added to give you the ability to annotate your screen like John Madden during a football game.

It's definitely an exciting time in the world of Google Workspace for Education.. What new features are you most excited about?