Thursday, February 18, 2021

Quickly Have IEP Accommodations at a Glance (Privately)


The adjustments to schools and teaching due to the COVID-19 pandemic have made it difficult to address the needs of students on IEPs. As teachers, keeping track of the accommodations is no easy task. One way I have been able to keep myself mindful of these things is a simple Google Doc. SPED student case managers sent me PDF documents called IEP At a Glance. These documents have all the pertinent information for the classroom teacher. These documents have the specific accommodations for each student. 

I save these PDFs in a folder in Google Drive and create a table in Google Docs. The table has a row for each student and columns where I write a short summary of student accommodations and my own notes. Since I have each student's At a Glance PDF in a folder in Google Drive, I can easily link each student's document to their name on my table. 

Start by creating a Google Doc and inserting a table. As seen below, I have a column for period, name, accommodations and teacher notes. 


Highlight a student's name and click the link button on your Google Docs toolbar. Go to your file in Drive, get the link and paste it below.


To get the link, find your IEP files in Drive. My advice is, when you receive the file from the case manager, make a copy of it that you own. 


Once you find the appropriate file, right click on it and select Get link.


In the small window that appears, do two things. First, make sure the file permission is Restricted. This is important because this is a legal document. You don't want others accessing it. This document is for your eyes only. Once it's set to Restricted, click Copy link. Go back to your Doc and paste it as linked text.


To keep your IEPs At a Glance handy, you could bookmark in Chrome. But if you're anything like me and you have too many bookmarks, use the Priority tab in Google Drive. In the Priority tab, you can add Drive files to a Workspace. Workspaces in the Priority tab are useful for displaying and accessing often-used documents without having to fish through a congested Google Drive.

If you haven't created a Workspace yet, click Create. 


After titling your Workspace, click the Add files button in the top right corner. This will allow you to add any file saved in Google Drive. Once created, you can go to the Priority tab, open the Workspace and easily access this and other important documents.


Anything we can do to accommodate students on IEPs is a good thing. Having quick access to IEP accommodations is hugely helpful when lesson planning. What other ideas do you have for providing and organizing IEP accommodations? 

Wednesday, February 17, 2021

New Chrome Feature: Share Any Webpage as a QR Code


QR Codes are a fun, cool way of sharing information. You can share contact info, a wifi password (I have one framed for guests at my home to scan and access the wifi), digital check-ins or attendance, links to games and projects, and much more. Recently, Google Chrome added a feature that allows you to generate a QR Code from any webpage right from the Omnibox (address bar).

To enable the QR Code generator, paste chrome://flags/#sharing-qr-code-generator into the Omnibox and click enter/return. This will open a tab called Experiments. Click the button titled Default. In the dropdown menu, select Enabled. This change won't take effect until you relaunch Chrome. At the bottom right of the screen, you'll see a button titled Relaunch. Click the button, and when Chrome relaunches, you'll now have the option for the QR Code generator.

Now that you have enabled the QR Code generator, navigate to a webpage and click on the URL to "highlight" it. 


On the far right of the Omnibox, you will a series of small buttons. One of them, circled below, is the QR Code generator.


After clicking the QR Code generator button, a QR Code will appear. This can be scanned with a QR Code scanner app on any smartphone or tablet. In addition, you can click Download to save it and print a physical copy.

Friday, February 12, 2021

Have Kids Easily Create Memes in Google Classroom


Memes are a huge part of popular culture. We all have laughed at a meme we've seen on social media. Students talk about the memes they saw online with their friends. A few years back, I started having students create memes for topics they learned in my history classes. They served as a method for students to connect popular culture to the historical topics they were learning. 

They are great for history, but can be done in any subject. Finished memes could be jumping off points for academic conversations and critical thinking exercises. They can be a great starting point for building a robust feedback loop as well.

Below are some student examples from this school year. These come from a lesson I taught on the American Revolution. Each meme was created with Google Slides via Google Classroom.

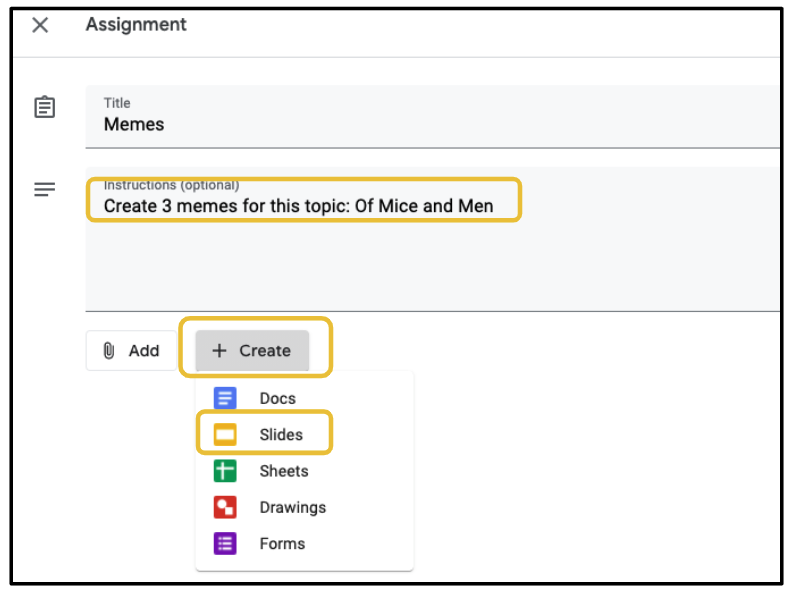
Get started by creating a Memes Template assignment in Google Classroom. The template allows you to reuse the post over and over without having to reinvent the wheel. Add simple instructions that can be altered if needed each time you reuse the assignment. Click Create and choose Slides. When you reuse it in the future, a new copy of this Slides template will be made each time. With each reuse, if you need to augment it, you can, but the basic structure will always be the same.


Below is an example of the template I use. I like to use the grey space on the outside of the slide to insert a box with instructions. Students will have to find a background image and paste it on the slide. Teach them how to layer it where the image is in the "back" of the slide with the captions on top of it. This can be done by right clicking on the image after it's been pasted onto the slide. 

From there, I use Word Art to insert a space for the captions. My instructions tell them to double click on the Word Art to edit it with their captions. When this template is reused in the future, I can duplicate this slide for as many slides necessary for the topic I am teaching. 


After setting up the template Slides presentation, be sure to set it to Make a copy for each student.


Below is an example from earlier this school year. Reviewing student work is a breeze. Click on the thumbnail of a student's submission and marvel at their memes. Use this as an opportunity to leave text feedback in the Private comments section or voice comments if you have the Mote Chrome extension. Click here to learn more about Mote.


Moving forward, click Reuse post in Google Classroom to reuse your Memes template. I recommend creating a Google Classroom Shell with no students invited to house all of your template assignments. This has been a huge time saver for me. Click here to learn more about creating a Google Classroom Shell.


Each time you reuse the Memes template, simply change out the topic. No need to create new slides because a new copy of the original will be made. The new copies can be augmented as needed and the original will not be changed.


Thursday, February 11, 2021

Asynchronous Thin Slides with a Dash of Flipgrid


Thin Slides might actually be my favorite of all the EDUProtocols. It's quick, easy and it gets all students listening and speaking in a short amount of time. The COVID-19 pandemic has forced us to evolve the way we teach and EDUProtocols are no different. The beauty of EDUProtocols is that they are highly adaptable. 

In distance learning, a buzzword, one we hardly ever used before, is asynchronous. I've said this word more times in the last 10 months that I ever in the previous 15 years of my teaching career. Asynchronous lessons have become something most of us have to plan for each week. Normally, Thin Slides is done live and as part of synchronous lesson, but I have an idea for facilitating this activity asynchronously.

Before we jump into how to do it asynchronously, here are the steps for how I adapted it for synchronous lessons in distance learning.

1. Create a template Assignment in Google Classroom and add the basic Thin Slides instructions

2. Click Create, select slides and create a template for students to put their one picture and one word. Make a copy for each student.

3. When kids are finished building their slide, open the Assignment on the teacher end of Google Classroom, share your screen and you can quickly scroll through each kids' submission. Students unmute to do their 5-7 second micro-presentation when their slide appears on the Zoom. Click here to read my blogpost that shows how to do this in greater detail.

My idea for asynchronous Thin Slides takes the steps listed above and adds Flipgrid to the mix. 


Below is an example of a template slide for students to put their one picture and one word. The beauty of this is that you can reuse this assignment over and over without having to recreate slides. Each time you simply edit the topic.


Here is where the asynchronous Thin Slides adds Flipgrid to the mix. Open a new tab and go to your Flipgrid account. Create a new topic, title it and add instructions for the kids to use the Flipgrid screen record function to record themselves presenting their slide.


Normally, in Thin Slides, students have 5-7 seconds to present, but the minimum in a Flipgrid topic is 15 seconds. Be sure to keep Topic Moderation turned off so kids can see each other's videos.


After setting up your topic, add the link to the Google Classroom assignment.


On the student end, after building their slide and recording their micro-presentation with Flipgrid screen record, they will watch their classmates videos and leave comments. Do this so students can see the different takeaways and ideas classmates have.


To hold them accountable, set a rule that they must comment on at least three classmates who had a different takeaway or idea as them.


Friday, February 5, 2021

Record Immersive Reader as Scaffold for English Learners


If you haven't added the Immersive Reader Chrome extension, you're going to want to ASAP. This Chrome extension allows you to select text online, right click and have it read aloud in virtually any language. Parts of speech can be color coded in addition to other features. If it all possible, coordinate with whomever is in charge of your school's Google domain and have this extension pushed out to student accounts. It is a valuable tool for English learners accessing content.

If you have access to the Chrome Web Store, add it to Chrome. If no access, speak to whomever is in charge of the domain ask them to push it your account.


Go to virtually any web page and highlight/select some text.


Right click on the highlighted/selected text. In the menu, click Help me read this.


After clicking Help me read this, the current tab you're in will be taken over by Immersive reader. To return to page where you found the text, click the back arrow in the top left corner (not shown here). On this page, you'll see the text in big letters and a play button at the bottom. The play button will immediately read you selected text in English.


To translate, in the top right corner, click the icon that looks like an open book. This will open a menu with many options on the right side of the screen.


Below where it says Translate, click the dropdown menu and select your desired language. At the bottom of this menu, turn on the switch for Document. This will translate the entirety of your selected text.


Almost instantly, you'll see the language of the text translate. Click the play button to have it read in the new language.


If your English learners need further assistance or an extra scaffold, use your favorite screencasting tool to record the reading of the translated text. You can share the video with the student and have them follow along the English text while hearing it in their language.


The example below was created using Screencastify. 


Thursday, February 4, 2021

Reply All: Please Stop


We all have horror stories of incessant notifications from a Reply All email. Nobody wants their inboxes filling up with replies that often are irrelevant to you. Now I am not trying to demonize Reply All as it is a useful function for collaboration, but the issue is that it gets used too often, usually inadvertently. Let's take a look at a couple of ways you can defend yourself and others from the scourge of Reply All.

In Gmail, you can set it that your default reply behavior is to reply only to sender. Start by clicking the Settings gear in the top right corner. In the dropdown menu that appears, click See all settings.


Scroll down to Default reply behavior. Make sure to check Reply. This sets it so clicking Reply means you are only replying to the sender and not all included in the message. You still have the option to Reply All if necessary, but it's no longer default.


Another way to limit Reply All fiascos is how you include others in the messages you send. Usually, you just start entering recipients into an email message as seen below. Sending this way, all recipients will know that who else is included in the message and they can be subject to any Reply All's. 


Often forgotten is the BCC option. BCC stands for Blind Carbon Copy. Clicking BCC means that recipients will not know who else has been included in the message. It feels like the email was sent to them only. When they reply, the reply goes to you the sender. I learned the value of BCC when I began my blog mailing list and accidentally didn't use BCC and everyone's email was available to be seen by all on the list. If you're on my list, you can rest assured I don't make that mistake anymore.


After clicking BCC, a new row will appear where you will enter the names or addresses of recipients.


When you receive a BCC email, seen below, you will know you have been included in this message via BCC and this means others also received the message. If I were to reply to this message, the reply goes back to the recipient only.


If you are to click the little arrow next to BCC, seen below, you'll see details of the message confirming BCC and you will not see the addresses and names of other recipients.

Using BCC and setting your default reply behavior are two small things that can be done to combat the tyranny of Reply All. Use Reply All when necessary, but not by default. Do these two things and your colleagues will thank you.