Wednesday, August 12, 2020

Get Acquainted with Your YouTube Channel


When we were kids, we knew if we didn't want to miss our favorite shows, we had to be in front of that TV at the time the show was on. If not, we missed out. Our bathroom breaks couldn't be longer than the length of a commercial break if we didn't want to miss anything. The current generation doesn't know that struggle. Their entertainment is totally on-demand with the ability to pause and rewind everything.  In addition to Netflix, Hulu, Disney+ and other streaming services, YouTube is right up there with kids' favorite methods of entertainment. 

As distance learning has nudged us toward pre-recorded asynchronous lessons, YouTube is a great tool for engaging students and helping English learners access content. YouTube allows English learners to enable subtitles on the video in their home language. In addition, YouTube videos use less data and bandwidth than streaming a video from Google Drive.

To get started on YouTube, you have to enable your channel. Believe or not, your school Gmail account already has a channel. You just need to enable it. Once enabled, as you upload your lessons, you'll use the YouTube Studio to manage the videos in your account. The videos below show how to enable your channel and how to navigate the YouTube Studio.

How to Enable Your YouTube Channel

The Basics of Your YouTube Studio in Your YouTube Channel


How Students Change Their Name in Zoom

It is now day 2 of our distance learning journey. One thing that has stood out is that getting to know our students virtually is difficult when you can't see their names on Zoom calls. For a variety of reasons, students don't always display their first and last names. 

As I search for a permanent solution to this, here is one way to deal with the situation. In your Zoom settings, allow for students to rename themselves. Take a minute to instruct them to rename themselves properly with their first and last name. You many want to remind them their attendance depends on it. Make it a norm for students to always have their first and last names displayed during Zoom calls. 

The video below shows students how to rename themselves properly. Feel free to share this video with students or play during your next Zoom.


Monday, August 10, 2020

Resources Topic in Google Classroom Classwork Tab


A best practice, especially during distance learning, is to have a Resources Topic in the Google Classroom Classwork Tab. Think of this as a bulletin board for your Google Classroom. You will want to keep this Topic pinned to the top as it will house resources, etc. students will access often and you'll want them to be able to find them easily. 

The first step is to go into the Classwork Tab of Google Classroom and click Create. Select Topic and title it Resources. As you add more Topics each week, the most recently created Topic gets pinned to the top. You are able to drag and drop Topics. Be sure to drag the Resources Topic back to the top each time. 


Zoom Norms, a syllabus and Class Zoom link are examples of things you will want to house in your pinned Resources Topic.


How To Add Assignments with Topic to Multiple Classrooms


If you are teaching multiple periods of the same class, save time by assigning the same assignments, quizzes, questions and materials to multiple Classrooms at once. You can even add topic that will get pushed out all Classrooms you choose.

Start by going to the Classwork Tab and clicking Create. Choose Assignment, Quiz assignment, Question or Material.


When setting up your activity, on the right side, click the Classroom you're in and then check mark the other Classrooms you'd like to send this activity.


On the right, below the points value, click Topic and either select a Topic or create a new one. 


Invite Students to Your Google Classroom via Email


Normally, you'd see students face to face in the classroom and you'd write on the board or project the class code on the screen. In distance learning, this is not possible. To get students into our Google Classrooms, we will have to invite them via email. This does assume students will check their emails and accept the invitations. 

Step 1

Go to Google Classroom People Tab. Click the invitation button in the Students section.


Step 2

Enter the student's name or address and select it when it pops up. Click invite when you've entered all the names.

Students names will appear in the students section immediately upon accepting of the invitation. 


Friday, August 7, 2020

Illuminate to Google Classroom


Save time by connecting your Google Classroom to Illuminate. Since you are logging into Illuminate with your district Google account, this connection is made for you. Using this connection will save you a bunch of time by importing grades collected in Google Classroom to Illuminate. Take a look at the screenshots below to learn how.

The first step is to create an assignment, quiz or question in the Google Classroom Classwork tab.
The second step is to set up your assignment by adding points, due date and topic.

When you are ready to begin inputting grades, go to your Illuminate Gradebook. Select your class gradebook and click the Assignments tab. In the dropdown menu, select Import from Google Classroom.
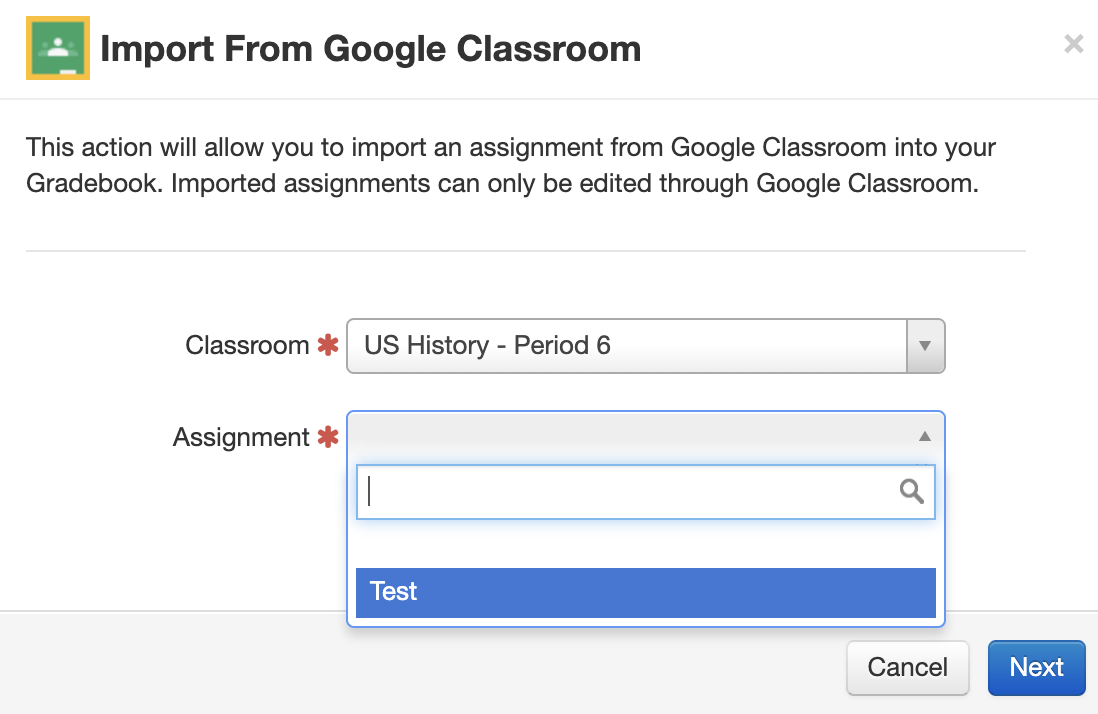
After selecting Import from Google Classroom, the window below will appear. Once it processes, click Classroom and select the Google Classroom associated with the current gradebook.


After selecting the correct Google Classroom, click Assignment. Upon clicking, a dropdown menu will appear displaying all of the assignments in that Google Classroom. Select the one you want to import to Illuminate.


In the window that appears, you'll see the details of the assignment you wish to import. Before importing, double check the details. If you find a mistake, go back to Google Classroom to edit the assignment. You are not able to edit a Google Classroom via Illuminate. 

Hopefully this is helpful. Please reach out to me via email and or Google Hangouts if you have any questions on the content of this blog post.


Sunday, August 2, 2020

Cardinal Innovation Center Sketchnotes Gallery Rewind: 9th Grade Scientific Method


This batch of sketchnotes from Mrs. Jobe's 9th grade science class from the 2018-19 school year. Her students sketchnoted each step of the scientific method. Students were encouraged to use a variety of strategies to organize the information with a combination of images, symbols, text, color coding, arrows and more. Click here to see all of these scientific method sketchnotes.