Friday, September 10, 2021

Archive Your Old Google Classrooms


As the years go by, the amount of Google Classrooms we create tend to accumulate. Archiving your old Google Classrooms are an easy thing to forget. If this is the case, when you go to the Google Classroom homepage, you will see a clutter of old Classrooms. This can be annoying. 

As we transition to Aeries, there are many bumps in the road. One bump I've encountered deals with importing scores from Google Classroom to Aeries Gradebook. When you import a single assignment the first time, a menu appears for you to choose the Classroom from which to pull the scores. If you haven't archived your old Classrooms, they will all appear in the menu and make it difficult to find the current Classroom you are using. This may lead to a problem where you choose the wrong Classroom and cannot find the corresponding assignment.

Clean up your Google Classroom homepage by archiving old Classrooms. Start by going to the Google Classroom homepage and hovering your cursor over an old Classroom. Click the three dots in the top right corner of the Classroom and select Archive.


If you ever need to resurrect an old Classroom, you can restore from the archive.


In the archive, follow the same steps as you would to archive and old class, but this time, click Restore.


With old Classrooms archived, it's much easier when importing scores into Aeries.


Since I've archived my old Classrooms, I have a short list of Classrooms from which to choose. If I haven't archived my old Classrooms, this list would be much longer and the import process would be more difficult.


I highly encourage you to take the time to go back and archive old Classrooms. If there are old assignments you still want to reuse, think of creating a "Class Shell" and reusing those old assignments in the Shell for future use. Doing this will save those "oldie, but goodie" assignments and allow you to archive old Classrooms. Click here to read more about creating a "Class Shell".


Increase Engagement with Flipgrid......Get Certified Too!


For kids these days, apps like TikTok, Snapchat and YouTube Shorts are all the rage. Students engage with these apps voluntarily. If you're looking to leverage the engagement students have with those apps with what you're teaching, give Flipgrid a whirl. The aforementioned apps incorporate video, filters, etc. Flipgrid is a great way to leverage those things with your students.

If you are reading this, it's very likely you're familiar with the basics of Flipgrid. If you're looking to up your Flipgrid game and connect with likeminded educators, check out Flipgrid's Certification program. Flipgrid offers three certification levels. Level 1 is called Certified Educator. Level 2 is called Certified Expert. Level 3 is called #GridGuide. Click here to begin your journey.

I, myself, recently completed the Level 1 Certification and am raring to have a go at Level 2. To get started with Level 1, Microsoft has created user friendly training course that will give you many ideas for how to use Flipgrid. Upon completion, you'll receive a badge like the one you see above.

For me, Flipgrid has been an invaluable tool for helping to empower and engage my English learners. It really helps increasing opportunities for listening and speaking. How will you use Flipgrid to increase engagement? 

Wednesday, September 8, 2021

Get Started with "Choose Your Own Adventure" Stories Using Google Forms

Just the other day, I wrote a blog post on how to get started with "Choose Your Own Adventure" Stories using Google Slides. It's a great way to give multiple perspectives when students read as well as inject a little bit of voice and choice. If you're a fan of Google Forms, you can create these types of experiences with Forms too. One advantage Forms has over Slides is ability to track accountability. When students complete or submit, there is a record of them reading and which path they chose. You could have kids read all versions and do a comparison of the characters' journeys. The possibilities abound.

Take a look at the screenshots below to get started with the bare bones basics of creating "Choose Your Own Adventure" Stories with Google Forms.

The example below gives three options for students to choose. Jack and Jill went up the hill, but there are three forks in the road. They can fetch a pail of water, get a better view of the city or plant an oak tree. For this example, I typed the opening of the story as a multiple choice question and each option was a choice.


After putting the three options, I added a section for each option. Click the Add Section button (bottom right of the screenshot) to add sections for each option.


Below you can see the sections for each of the options kids can choose.


Next, I added a title and description to each section. Click the button you see circled (on the right of the screenshot) to add a title and description. In the title and description is where I typed a version of the story. Repeat this process for each section. For this example, I set each section or story version to dovetail at the same conclusion. At the bottom of the screenshot, you have a dropdown menu where you direct readers where to go next in the story after reading their chosen section. In this case, I directed them (in all three options) to go the end.


Below you can see the options of where to direct readers after reading a section.


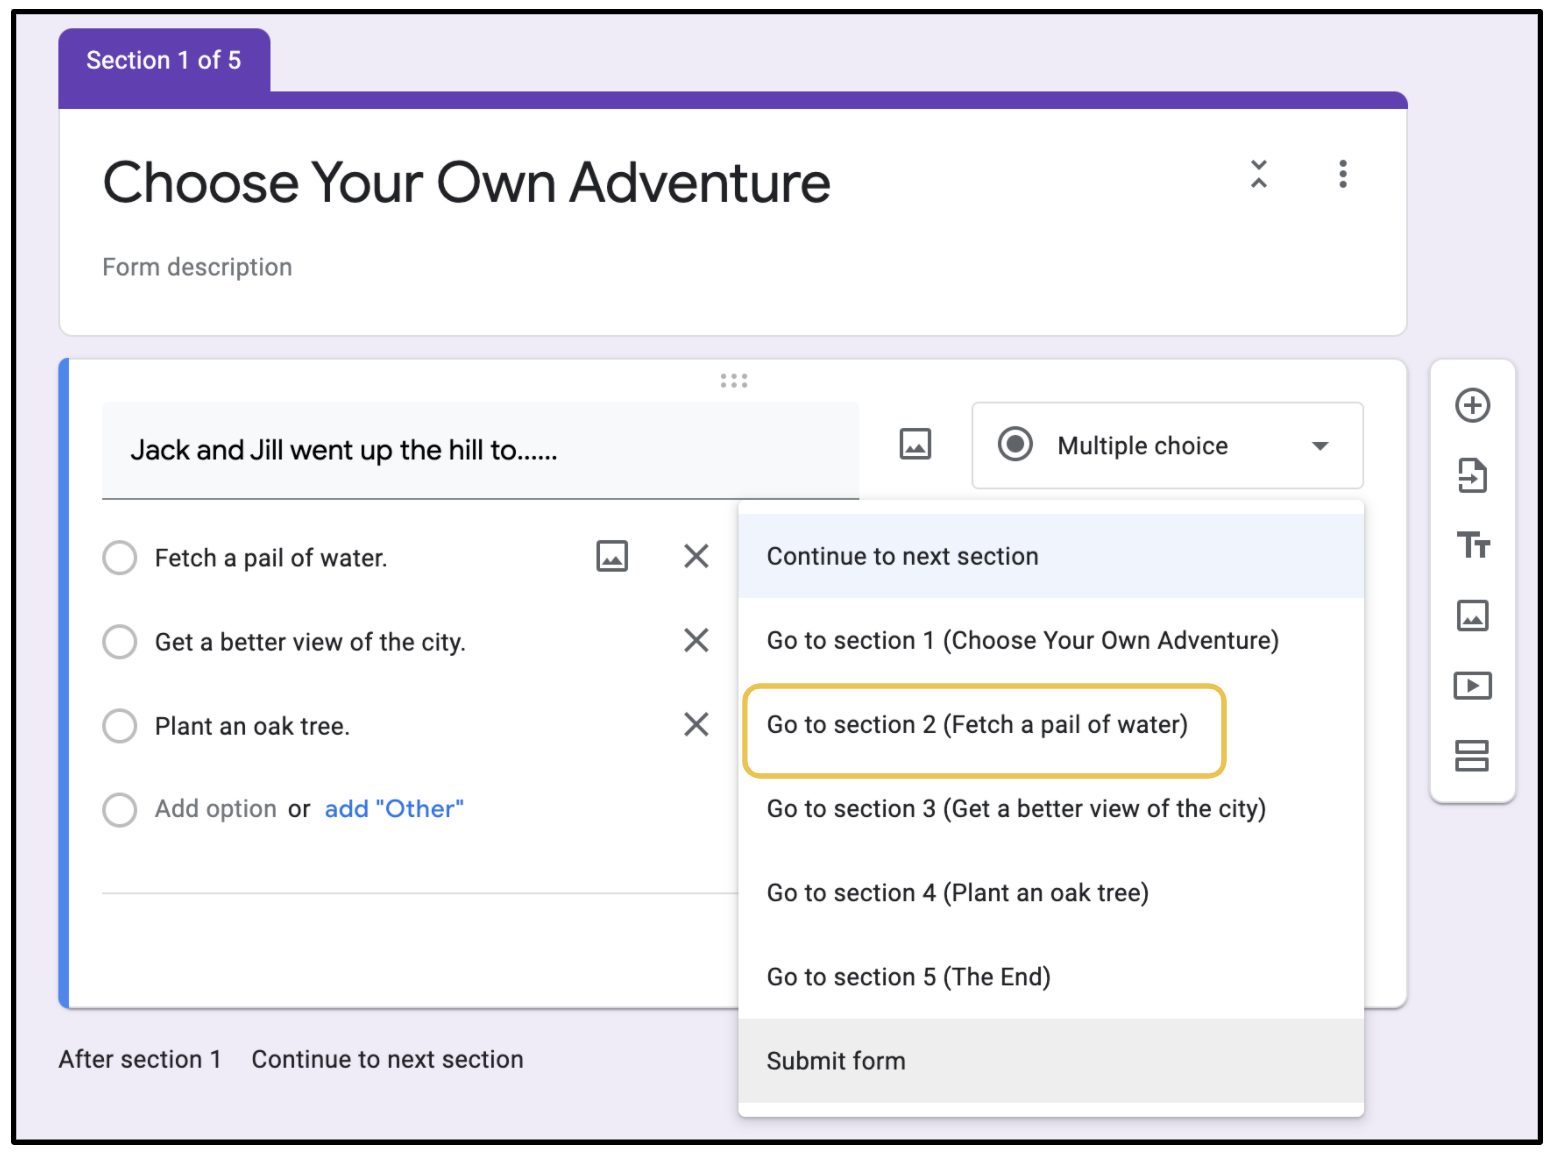
Now we need to circle back to the original fork in the road and set it so each choice directs the reader to its respective version of the story. In the bottom right corner of the question, click the three dots.


In the menu that appears, select Go to section based answer.


You will see a "Continue to next section" button appear next to each option. 


Click each "Continue to next section" button to determine which section the reader will go to based on their choice. Repeat this for each choice.


Below is what it looks like once you've set the destination for each choice.


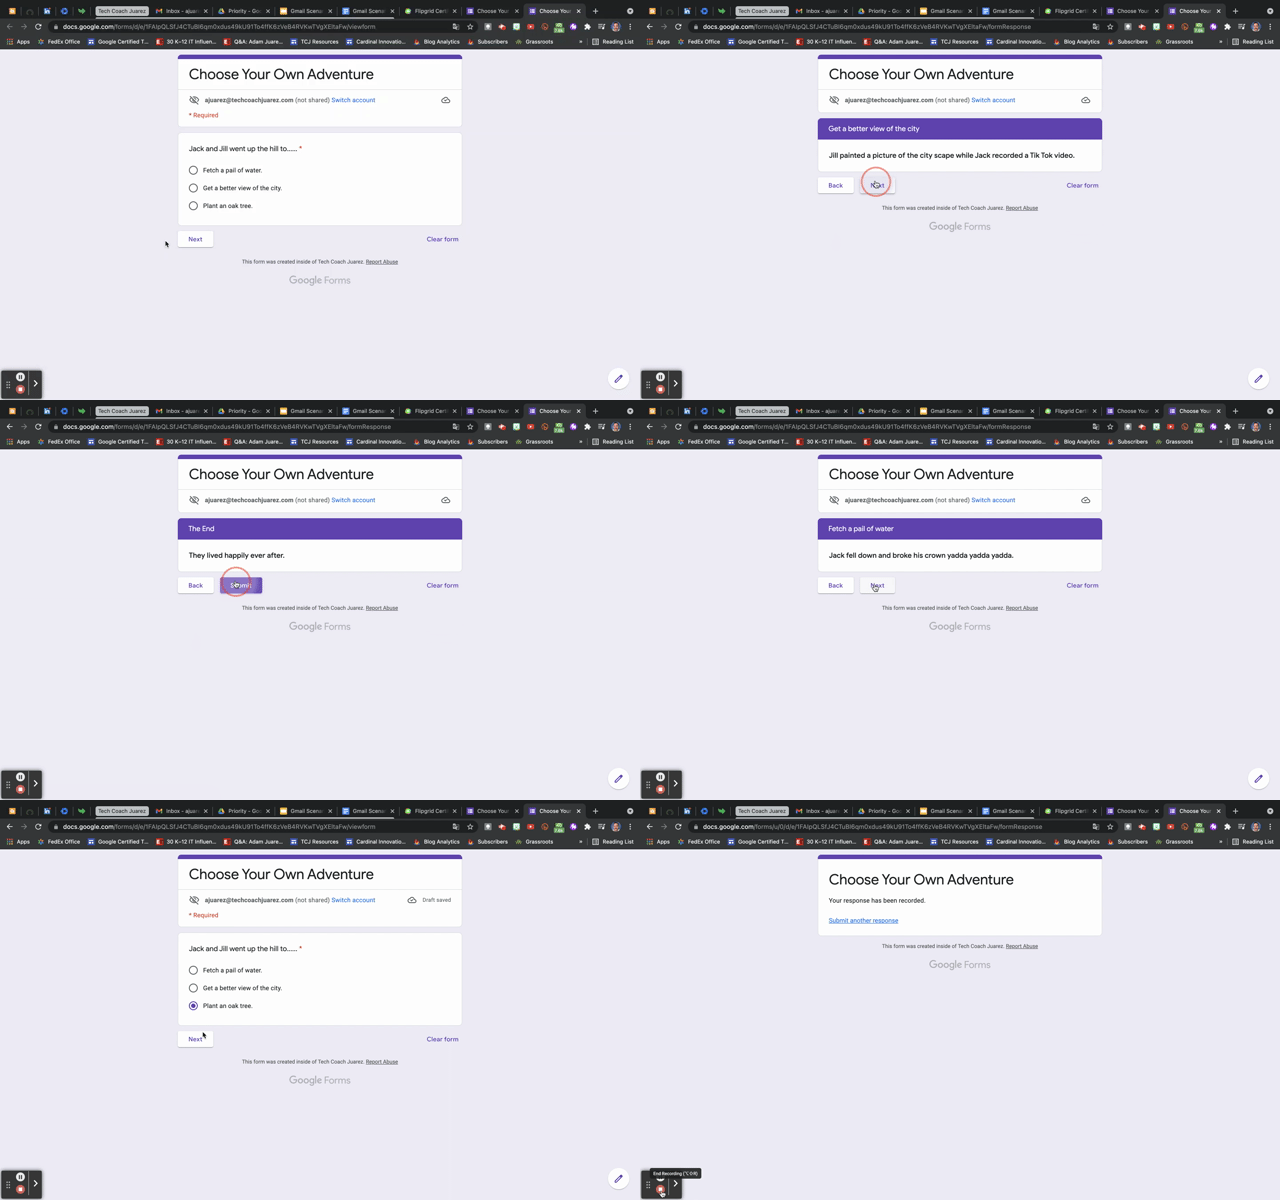
The example shown above is a very basic way to get started. The story was not overly complicated. The more versions and or forks in the road you put will require more planning and sections. My advice is to start simple and slowly branch out to create more in-depth stories. The GIF below shows all three versions of the story shown in the screenshots.


How will you use "Choose Your Own Adventure" Stories? If you have any questions and would like a follow up, contact me via Gmail or Chat at ajuarez@cojusd.org.


Tuesday, September 7, 2021

Get Started with "Choose Your Own Adventure" Stories Using Google Slides


A "Choose Your Own Adventure" Story is a fun, simple way to empower students to explore a variety of possibilities when reading a story. Instead of everyone reading the story in the same timeline, students can choose where to go at "forks in the road" of the story. The magic of linking text boxes to other slides makes this relatively easy to create with Google Slides.

Start by putting all the pieces of your story and the various versions onto their respective slides. Once your slides are created, at "forks in the story", create text boxes for kids to choose the direction they want to go. In the example below, there are two options. 


For each option, select the text with your cursor and right click. In the menu that appears, click Link. 


After clicking Link, select Slides in this presentation. This will allow you to choose which version of the story the student will navigate to.


Choose the slide that corresponds to the respective version of the story. Repeat this process for each version.


Below is a simple example of what it would look like if a student chose Option 1. 


Below is a simple example of what it would look like if a student chose Option 2. 


How will you use "Choose Your Own Adventure" Stories in your class? If you have some cool examples, please share on Twitter with the hashtag #OrganicEdTech or send me a link to ajuarez@cojusd.org. 
Thursday, September 2, 2021

Quickly Translate the Text on Your Google Slides


Back to School Night season is upon us and Google Slides are a valuable tool in presenting your classroom's rules, expectations and more to parents. For parents who speak a language other than English, it can be difficult to translate an English language presentation. For English learner students, not being able to see Slides presentations in their home language is a learning barrier. 

To help remedy these issues, take a look at the Translate My Slide Add On in Google Slides. Below is a sample slide typed completely in English. The Translate My Slide Add On will translate the text typed on the slide to a myriad of languages.


Start by clicking the Add-ons tab on the toolbar. From there, click Get add-ons.


The Google Workspace Marketplace will appear. In the search bar, type translator. Among the results, you'll see Translate My Slide. Click it to open and then click Install.


After installation, the next time you click the Add-ons tab, Translate My Slide will appear as an option. Click it and then click Start a new translation.


On the right side of your presentation, the a menu will appear. In this menu, choose your source language and target language. At the bottom, toggle the switch to Translate all slides with 1 click. Click Translate to start the process.

Depending on the amount of slides in your presentation, it only takes 10-20 seconds to translate. The larger the presentation, the longer it will take. When finished, you'll see a Job done alert.


After closing the Job done alert, you'll see the text boxes in your slides translated into the language of your choice. 


If you want to keep your original English language version unscathed, make a copy of it and run the Translate My Slide Add-on on the copy. This will give two versions, in different languages. For what will you use the Translate My Slide Add-on?

Wednesday, September 1, 2021

Engage Your Students with the Google Classroom Stream


The Google Classroom Stream can easily get overlooked as most work is done within the Classwork tab. If you use the default settings, the Stream can be a very confusing place with assignment posts being included with class announcements. Not too long ago, I wrote a post showing you how to configure the Stream settings so only class announcements appear and assignment posts do not. 

The Stream is simple, versatile tool for engaging students. The most common use is for class announcements. As seen below, type your announcement in the box.


When you start an announcement, some basic stylistic tools appear. These tools include Bold, Italics, Underline, Bullets and Remove Formatting. If you have the Mote Chrome Extension, a Mote button will appear as an option for leaving voice messages as an announcement.  Like with an Assignment in the Classwork tab, you have buttons to share files from Drive or computer, add links or YouTube videos.


Besides announcements, the Stream can be used for kids to do an exit ticket. This way, there is no collecting of slips of paper that can be difficult to manage or read. It's quick, convenient, informal CFU.


Below is an example of what a Stream exit ticket could look like.


You could use the Stream to give kids a sneak preview or head start on an upcoming lesson. For kids who like to work ahead, I often post a link, days in advance, to a Quizlet Study Set with the vocabulary we will be using for an upcoming lesson. 


The same way the Stream can be used as an exit ticket, it can also be used as a bellringer. When used as a bellringer, I like to add the instruction "When you sit down" to give kids clarity.


Video announcements are another way to utilize the Stream. If you're a YouTuber and upload videos YouTube, you can easily add YouTube videos as an announcement. Many kids will respond or react to a video announcement more often than just text. The example below is from a day I was absent and I left a video message to let the kids know why I was out and what my expectations were. This is easily done with the Google Classroom mobile app.


With the mobile app, start an announcement and click the "paper clip" button at the top of the screen. In the menu that appears, as seen below, click Record video. This video will not be on YouTube, but saved in your Google Classroom folder in Google Drive. 


As mentioned earlier, if you've installed the Mote Chrome extension, a Mote button will appear as an option. Click it to leave a voice announcement or reminder.


Below is what it will look like after you've posted a Mote message as an announcement in the Stream.


Another way you can use the Stream is to send students reminders for upcoming assignment due dates. In Classwork, each assignment has its own link. Copy and paste the link in a Stream announcement. Kids will have one click, easy access to the assignment without having to search for it in the Classwork tab. 


Below is an example for a Spanish Class where students are reminded when their "Cinco al Dia" assignment is due. All they have to do is click the link for quick access to the assignment. When using the Stream to post links to assignments, this not something you can do one time for all classes as each assignment within in each Classroom has different links. You will have to repeat for each Classroom.


These are just a few of the ways I like to engage students with the Google Classroom Stream. In what ways do you engage students with the Stream?

Aeries Mobile?!?! Talk About Convenience!


Our transition to Aeries has had many bumps in the road. One of the cool things about Aeries, that we didn't have with Illuminate, is access on our mobile devices. The Aeries Teacher app is free and available on iOS (iPhone/iPad) and Android. The app operates virtually the same on either platform. 

Take a look below for what it looks like on iOS. 


Take a look below at what it looks like on Android.


The Aeries mobile app is great if you don't want to feel tethered to your computer while taking attendance. This is helpful for classroom management. You can circulate the room in the beginning of class and take attendance at the same time. 

There is a cool feature called Class Tools that gives you a class roster view with pictures, a random student picker, the ability to create groups in addition to a game that matches names to faces. This game is great when you get new students and is fun way for you to get to know their names. The picture below shows the create group feature.


Which mobile app feature are you most excited to try? Contact me to help you get started.