Wednesday, December 16, 2020

Google Classroom and New Marking Periods Without Moving Students or Losing Assignments


Advice for which I often hear teachers ask is what to do with Google Classrooms at the end of a marking period. Whether on a trimester, quarter or semester system, I have heard numerous teachers ask for ideas and best practices. Many asking about this talk about how they don't want kids to access old assignments, but they still want to keep them available for future use. They want to accomplish this without having to make kids join a new Classroom each marking period.

Many educators simply create a whole new Google Classroom for the new marking period. But let's be honest. That's tedious and it's one extra thing students have to do. The ideas demonstrated in the screenshots below show you how to skip the tedium of creating new Classrooms and having students join new ones. Credit for these ideas goes to my colleague Larissa Goosev who came up with this brilliant idea during a recent ILT meeting.

Start by going to the Google Classroom homepage where you see all of your classes listed. 


Choose a class and click the three dots in the top right corner. In the drop down menu, click Copy. It is this copy of the Classroom that you'll save for future reference.


After clicking Copy, a window will appear where you will name the copy and add other information. Click Copy when all information is entered.


It takes a minute or so for the copy to appear in the Google Classroom homepage. 


What you will do next is go into the People tab of the copy of your Google Classroom. There you will find the invite link. You access this by clicking on the Invite students button.


When you click the Invite students button, a small window will appear. In the window, you will see an Invite link. To the right of the link, click the Copy button. Click Cancel after copying the link.


After copying the link, go back to your original Classroom. Delete any old assignments or posts you no longer want students to access. 

 
After getting rid of old assignments and posts, go to Create and click Material. You are going to post the Invite link to the copy of the Google Classroom as a Material in this Classroom. 


Title your Material and click Add. Click link and paste the Invite link.


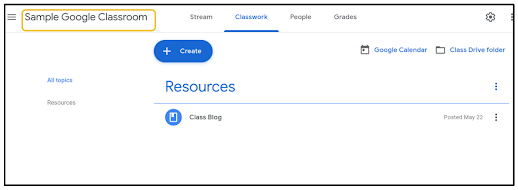
When you want students to access old assignments from the previous marking period, instruct them to go to the Material containing the Invite link to the copy of the Google Classroom. My advice is to have this Material posted in a Resources topic that you keep at the top of Classwork at all times. This makes it easy to find and access. 


When students join the copy of the Classroom via Invite link, they will be see the old assignments from the previous marking period.


This idea and other Google Classroom hacks are going to have to suffice until Google gives teachers more features and controls that help deal with multiple marking periods. Google does listen to feedback. In the bottom left corner of Google Classroom, click the "question mark" button to leave feedback for features you want. If we all leave feedback often, changes will be made. 

Gallery Walk and Conversation with Google Photos in Distance Learning


Before COVID, gallery walks were a common teaching strategy. They get students out of their seats and can promote collaboration and conversation. Distance learning has forced us to change the mechanics of a gallery walk. One way to facilitate a gallery walk, synchronously or asynchronously, in distance learning uses Google Photos. 

One way to start could be to assign students a topic. Each student will upload an image of their topic to a shared album in Google Photos. On their uploaded image, they will add a comment with a description or explanation of the connection to a theme or essential question. From there, students will browse the images in the shared album asking clarifying questions in the comments. The student who posted the image is required to answer all clarifying questions. 

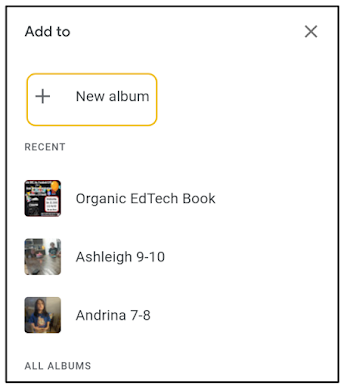
For teachers to start a shared album, open an image in Google Photos, click the three dots in the top right corner and click Add to album. (You can also go to the Albums tab in Google Photos and click Create album.)


In the menu that appears, click New Album. 


When the new album opens, give it a title.


Once it's titled, at the top, click the Share button.


In the menu that appears, at the bottom, click Create link.


In the menu that appears, you will see the link to the shared album. At the bottom right corner, click Copy.


With the link copied, either via email, Chat, Google Classroom or any means of communication you prefer, send the link to students. When students open the link, they will click the blue Join button to gain full access to the album, allowing them to add images to the album. For students, they will want to save their image to their device before adding to the album.


For students to add to the album, once they've joined, at the top, they will see a button to add images to the album. When they click it, they will be taken to a screen that will give them an option to Select from the computer. Their computer's files will pop up and they will select the file.


If on a Chromebook, what you see below is what it will look like. PCs, Macs and tablets will look different, but the concept will be the same.


Once they've selected an image to upload, they will be prompted to choose an upload size. I prefer students to upload at High Quality.


The name of the person who uploaded the image will appear on the image in the shared album. This is useful for students to know who added the image and for teachers to hold students accountable for participation. 


During the time allotted for the gallery walk, students will browse the images and click on an image to open a comments box that will appear on the right side of the image.


In the comment box, the "uploader" should leave the first comment explaining the image or its connection to a theme or essential question.


When a classmate opens the image, they will read the explanation and ask clarifying questions to spur a text conversation. The clarifying questions can also be used as talking points for breakout rooms in Zoom or Google Meet.


Each time a classmate comments with a clarifying question, the student who posted the image will reply and the conversation grows. 


A virtual gallery walk with Google Photos can be done both synchronously and asynchronously. The parameters for uploading images, explanations and commentary are totally up to the teacher and their learning goals/targets. How might you facilitate a virtual gallery with Google Photos? Please share your ideas.

If you have any questions and would like a follow up, contact me via Gmail or Hangouts at ajuarez@techcoachjuarez.com. 

My book, The Complete EdTech Coach: An Organic Approach to Digital Learning, co-authored with my wife Katherine Goyette is now available on Amazon. Click here to purchase. It is published by Dave Burgess Publishing. Be sure to follow the hashtag #OrganicEdTech and #CVTechTalk for updates.

Tuesday, December 15, 2020

Start the Teacher/Student Feedback Loop with Mote and Google Classroom


Many educators, recently, have fallen in love with Mote and the ability it gives them to leave personalized, voice feedback to students. I have to say, I very much enjoy leaving voice feedback to students, but there are still many students who struggle accessing the feedback and acting upon it. The series of screenshots below demonstrates how to get started leaving feedback as the teacher and how students access the feedback to resubmit work.

Start by opening an assignment in Google Classroom and opening a student submission. This will open the Google Classroom Grading Tool.


In the Google Classroom Grading Tool, on the right side of the screen, you will see a space to enter Private comments. If you have the Mote extension added to Chrome, a Mote button will appear in the Private comments space. Click this button to begin recording your verbal feedback. The examples shown below are from a Thin Slides activity about Adolf Hitler.


After clicking the Mote button, recording begins almost instantly. You will see the 1:30 countdown start. Click done when finished recording. In this Thin Slides about Adolf Hitler example, I verbally explained to the student that their image was of Joseph Stalin and not Hitler. If I were to leave comments on their turned in document, I may also verbally remind them on Mote to look for those comments as well before resubmitting.


When the recording is finished, it will appear as the text below. Click Post when ready.


Often times, students do not respond to feedback. If you have students who struggle with this, share the following screenshots with them. Remind them that when a teacher leaves a Private comment in Google Classroom, they will receive an email. Be sure they have comments and notifications turned on in Google Classroom. In the email, they can click on the title of the assignment or click Reply to be taken right to the assignment. They can also click the Mote link to hear the feedback without having to go to Google Classroom.


After hearing the feedback from Mote, and possibly reading text comments left on the document, students click Resubmit to turn in the latest iteration of their work.

Thursday, December 10, 2020

Don't Sit! JustStand.Org


A saying I've heard often the last few years is "sitting is the new smoking". This saying is worded to be more attention getting than anything, but it is little thought provoking. The point is about how a sedentary lifestyle or, in the case of teachers in distance learning, extensive sitting during the workday can have negative effects on health.

Just the other day, I was sitting at my desk when my mind wandered and I began reflecting on that saying. I tried to take stock of how much I sit each day. As I approach 40 (less than a month away), my body aches from years of soccer, father duties, house maintenance and scoliosis. Working out isn't as convenient any more with all the gyms closed and my motivation to do so has decreased. In my book, co-authored with my wife Katherine Goyette, we talk about being a "walking coach". We encourage edtech coaches to ditch their desks and try to walk and be in classrooms 80 percent of the day. Practicing what I preach, a normal coaching day, pre-COVID, would generate 12,000-15,000 steps a day. 

Distance learning has put quite a dent in my step count, and I catch myself tethered to the desk more than ever. To help combat this, I bought an adjustable desk that raises, allowing me to stand. Although my desk allows me to stand during work, I often catch myself sitting much more than I should. Sometimes I just get into that zone of answering emails, interacting on video calls and blogging. Just so you know, I am standing as I compose this blog post. 

With all that in mind, I researched the negative effects of sitting and, in doing so, came across a website called juststand.org. It isn't a very complicated or fancy site, but it did provide me with some insight that will help me get out my chair much more often while at work. 


The Calorie-Burn Calculator, after entering your information, shows you how many more calories your body can burn when you stand more often than sit. Now, this does not replace exercise, but burning calories is helpful for maintaining good health.


The Sitting Time Calculator helps you track the amount of time you are seated each day. This does require you to be honest. I know I was surprised to see the amount of time a day I spend sitting. 


The site also provides some Quick Facts.  A fact I found interesting was how the average person spends 7.7 hours a day sitting. That number has given me something to shoot for as I aim to stay below that number daily. Having a slow metabolism naturally, I found it interesting how 20 minutes of sitting can negatively affect your metabolism.

I am no health expert, but this site did open my eyes a bit. I know I will resolve to stand more. What can you do to get out of your chair and get on your feet during distance learning? I'd love to hear your ideas.


Wednesday, December 9, 2020

Rock the Comment Bank in the Google Classroom Grading Tool


Feedback is such an important part of the learning process. Having to repeatedly type similar comments over and over is time consuming and tedious. Sometimes we find little hacks to speed it up such as having a Google Doc or Google Keep note with comments saved for quick reference for copy and pasting. 

The Google Classroom Grading Tool has features built in to expedite this process and improve workflow when providing student feedback. When you open student work in Classroom, the Grading Tool opens in a new Chrome tab. On the right side of the screen, near where you can assign a Grade and add Private comments, is a button for the Comment bank.


The Comment bank allows you to store frequently used comments. To add a comment to the bank, click the Add to bank button. See the example below.


When you click the Add to bank button, a small window appears for you to type your comment. Click Add when finished. There does not appear to be a limit on the amount of comments you can save in the Comment bank.


One way to add a comment from the Comment bank is to click the three dots at the top right corner of a comment and select Copy to Clipboard. You are also able to edit the comment and delete it from this menu.


An even quicker way to get a comment from the Comment bank to the student submission is to hover your mouse over a comment. When you do, a copy button will appear in the bottom right corner of the comment. Click it to copy it to your clipboard.


Once copied, your comment can be quickly pasted, as seen below, to the student submission or as a private comment within Google Classroom.


Tuesday, December 8, 2020

Introducing Mic Mode on Flipgrid


If you didn't think Flipgrid couldn't get any better, think again. Flipgrid added a small, yet potentially powerful feature called Mic Mode. What Mic Mode does is allow students to simply record audio of their voice without video. 
At first glance, this doesn't seem super impressive, but after using Flipgrid for years now, I see great potential in this small tweak. Many students get anxiety when on camera. I have had many students who simply will not respond to Flipgrid prompts because of the uncomfortable feeling they get when they look at themselves on camera. 

Oftentimes, when I use Flipgrid, I am using it so I can hear the student verbalize their understanding. Normally, I would tell students to put a sticker on the camera, but Mic Mode solves this issue. Students who aren't comfortable on camera can still respond and I, as the teacher, can gauge their verbal understanding of a concept. 

When students open a Flipgrid link and begin the recording process, all they need to do is click the Options button. From there, in the menu that appears, they will click Mic only.


After clicking Mic only, the camera view is replaced with the screen you see below. From there, everything is the same when they record their response as it was before. They follow the same steps to complete the task and submit.